How to Prepare a Song for Streaming Release
To prepare a song for streaming release you do four things in order: master the mix — our free audio mastering tool does this in your browser — then measure loudness and true peak against the platform targets, deliver the file in the format your distributor actually wants, and get the metadata right. Everything after that is admin.
The loudness numbers are where most guides go wrong. Streaming-loudness tables list seven platforms with confident figures, and only one or two of those figures actually come from the platform. This one marks which is which.
Step 1 — Master the mix, don't just make it loud
Mastering is the final polish on a finished stereo mix: it evens out the tone, glues the elements together, controls the peaks, and sets the overall level. It is not a repair stage. If the vocal is buried or the low end is boomy, mastering makes those problems louder rather than fixing them, so go back to the mix first.
The instinct at this stage is to reach for loudness, and that instinct is a leftover from a war that ended. Streaming playback is normalized — the platform sets the level, not you — so a master pushed hard past the reference gets turned back down anyway. The loudness war explained covers what that cost. Your job here is tone and dynamics.
If you don't have a mastering chain, the Audio Master tool runs a real one in the browser: a high-pass filter to clear sub-bass rumble, multiband compression, mid/side stereo width, and an output trim that feeds a limiter. The trim sitting before the limiter is the important detail, because pushing toward a loudness target then drives the limiter the way a real chain does, instead of just turning everything up into the ceiling. It also gives you a level-matched A/B. Louder always sounds better for the first few seconds, and level-matching removes that bias so you're judging the master and not the volume. Step through the controls one at a time in how to master a song online for free.
One honest limitation, because it sets up the next step: that limiter's ceiling sits around −1 dB and it is a standard dynamics limiter, not a true-peak limiter. It works on sample values and clamps them toward a ceiling; it does not predict what happens between samples. Which is exactly why measuring true peak is its own step and not a redundant one.
Step 2 — Check loudness and true peak against the platform targets
Two numbers decide whether your master behaves on streaming: integrated LUFS (loudness units relative to full scale, a hearing-weighted average of the whole track defined by ITU-R BS.1770) and true peak in dBTP, the highest level the waveform actually reaches, including peaks that fall between digital samples. What LUFS means covers the measurement in more depth.
The volume normalizer reports both, before and after, on a file you already have, and accepts MP3, WAV, FLAC and M4A. Its true-peak figure is a 4× oversampled estimate rather than the full BS.1770 filter, which is close enough to set a clip-safe ceiling by. Use it as a meter first. Load your master, read the two numbers, and only then decide whether anything needs to move.
What the platforms actually normalize to
| Platform | Playback normalization | Source |
|---|---|---|
| Spotify | −14 LUFS by default; Premium listeners can pick Loud −11, Normal −14 or Quiet −19 | Documented — Spotify's own Loudness Normalization page |
| SoundCloud | Tells you to target −14 LUFS integrated and stay below −1 dBTP | Documented — SoundCloud's own help centre |
| Apple Music | Sound Check on stereo music is commonly measured around −16 LUFS, which happens to match the top of the AES TD1008 recommended range for music | Not published by Apple |
| YouTube | Turns loud uploads down. Its own player exposes each video's content loudness and normalization target in Stats for nerds, and the target usually reads −14 dB | Not published by Google — readable per video, not from a spec page |
| Tidal · Amazon Music · Deezer | No first-party figure | None — circulating numbers trace back to community measurement or to blogs citing each other |
Spotify has the most published, first-party detail. It normalizes playback per ITU 1770 to −14 LUFS by default, and it states that normalization is applied during playback: it measures loudness at upload but does not process or change your audio track. On the Loud setting it also applies a limiter, set to engage at −1 dB — sample values, note, not true peak — with a 5 ms attack and a 100 ms decay.
For the bottom row, the honest answer is that nobody outside those companies knows. That's a gap in the public record, and it's why the sensible move is to master for one reasonable target and stop. A master that sounds good at −14 also sounds good at −16. It is the same master, played at a slightly different level.
Why the loud master loses
Normalization is not symmetrical, and the asymmetry is where the money is. If your master is louder than the reference, playback gain is applied downward: the listener hears it at the same level as everything else, except you already paid for that loudness by squashing your dynamic range to get it. You keep the flattening and lose the level. That's the whole trade, and it is a bad one.
Quiet masters are a different story, and it's the detail most guides skip. Spotify does apply positive gain to softer masters to bring them up to −14 LUFS — but only as far as your headroom allows, because it deliberately leaves 1 dB of headroom for lossy encoding. Its own worked example: a track sitting at −20 LUFS with a true peak of −5 dBFS gets raised to −16, not −14. So headroom doesn't only protect you on the way down; a lack of it quietly costs you gain on the way up.
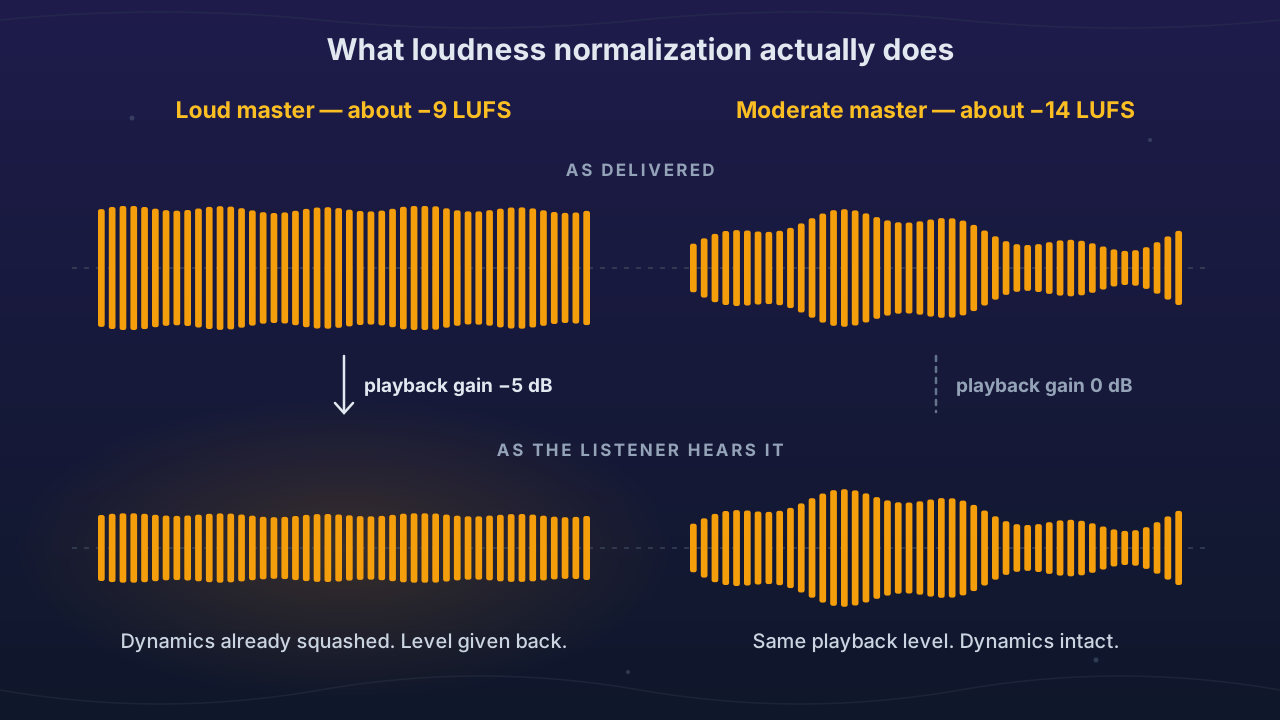
The mirror-image myth is "master to exactly −14 LUFS." For Spotify that figure is a playback reference, not a mastering target — SoundCloud is the one platform that actually asks you to aim at it. Landing at −12 or −16 is fine; what matters is that the master sounds the way you want when it's played at the platform's level. If you genuinely just need a finished file moved to a target level without re-mastering it, that's a different job — see how to normalize audio volume.
The true-peak rule Spotify actually publishes
Most guides flatten this into "always −1 dBTP." Spotify's published guidance is conditional: keep true peak below −1 dBTP, and if your master is louder than −14 LUFS integrated, keep true peak below −2 dB. SoundCloud publishes the same pair of rules. The louder you go, the more margin you owe. If you're mastering at −11 LUFS for a club-leaning release, −1 dBTP is not enough.
Why any margin at all? Because lossy playback is not a copy of your file. Spotify's lossy streaming today is AAC, and a lossy codec doesn't store your samples: it stores quantized frequency-domain coefficients, and the decoder rebuilds sample values from them. Quantizing those coefficients is equivalent to adding a small amount of shaped noise to the waveform. On a heavily limited master, where thousands of samples sit flat against the ceiling, roughly half of them get nudged upward — so the decoded file peaks higher than the one you exported. Measured on real music the overshoot runs to more than a decibel, and it gets worse as the bitrate drops. The AES streaming recommendation is a −1 dBTP ceiling at the codec input for exactly this reason.
Two things worth separating, because plenty of writing on this conflates them: codec overshoot is not the same phenomenon as inter-sample peaks, and the two stack. A master sitting at, say, −0.3 dBTP in your editor — comfortably under full scale by your own meter — can still come back over 0 dBFS on the listener's device, in a version of the file you never hear. That margin is headroom doing its job.
To set it: the volume normalizer has an LUFS mode with four presets (−14 Spotify, −14 YouTube, −16 Apple Music, −9 club/loud) and a prevent-clipping option on that mode which caps true peak at −1 dBTP, or a peak mode with a ceiling slider running from −6 to 0 dBTP if you'd rather set the number yourself.
Step 3 — Deliver the right file
You cannot upload directly to Spotify. Its artist upload beta closed at the end of July 2019, so every release now goes through a distributor, and the distributor's spec is the one you have to satisfy.
| Where | What it wants |
|---|---|
| DistroKid | WAV, MP3, M4A, FLAC, AIFF or WMA. If you send a WAV, 16-bit/44.1 kHz is typical but "pretty much any specification works". Max 1 GB per file; tracks under 5 hours |
| TuneCore | Names only WAV. Recommends 24-bit/192 kHz, accepts 16-bit/44.1 kHz |
| Amuse | WAV or FLAC, 16 or 24 bit, 44.1 kHz up to 192 kHz, stereo |
| Spotify (delivery spec) | Strongly prefers FLAC; WAV also accepted. 44.1 kHz or higher, stereo. 24-bit if that's your native master, 16-bit if nothing deeper exists |
| Apple Digital Masters | 24-bit source, not upsampled or bit-padded from 16-bit. Apple's own recommendation is to leave at least 1 dB of headroom |
Two things follow. First, Spotify's own instruction is to deliver your highest-quality native stereo master and not to downsample it, reduce its bit depth, or apply processing that changes quality before delivery. Files below 16-bit/44.1 kHz get upconverted, but they are not eligible for lossless playback. Second, and this is the myth that costs people quality: "you must upload 24-bit" is wrong. Deliver your native depth. Upsampling a 16-bit master to 24-bit adds no information; it just makes a bigger file, and Apple Digital Masters explicitly asks you not to bit-pad one into the other. (The one LUFS figure Apple publishes for music, a −18 LKFS ceiling, applies to immersive and Dolby Atmos releases, not to your stereo master.)
That has a direct consequence for tooling, including ours. The audio converter handles MP3, WAV, FLAC, OGG, M4A, AAC and Opus, and its WAV output is 16-bit PCM. So if your DAW already exported a 24-bit master, send that file. Don't round-trip it through any converter, which is exactly what Spotify's don't-process-before-delivery guidance is warning about. Reach for a converter when you need a genuine format change from a file you already have, like WAV to FLAC because your distributor prefers it, never to upgrade a master. The best file formats for audio editing breaks down what each container preserves.
Step 4 — Metadata: what the stores read, and what they ignore
Almost all of the metadata that reaches listeners — artist name, track title, release date, artwork, credits, and your ISRC — is entered in your distributor's release form, not embedded in the audio file. DistroKid is blunt about this: embedding metadata isn't necessary, and any prior embedded information "will be disregarded by streaming services." On ISRCs specifically, it says embedding one does no harm, but the services ignore that data. TuneCore goes further and asks you not to embed anything, on the grounds that it can cause delivery problems — so this is one place where distributors genuinely differ, and your distributor's page is the one that counts.
So "embed your ISRC and tags before upload" is a myth. Worth knowing what an ISRC is anyway, since you'll be asked: the International Standard Recording Code is 12 alphanumeric characters — a five-character prefix (two letters, then three alphanumeric), the last two digits of the year the code was assigned, and a five-digit designation — administered by IFPI as the international registration authority under ISO 3901:2019, with the RIAA running the US agency. It is not "12 digits," despite how often that's repeated; the country-code letters alone rule that out. Distributors can be appointed as ISRC managers and assign codes on your behalf. DistroKid says it does this free and automatically, but only for recordings that don't already have one — an ISRC is meant to follow a recording for life, so a re-release keeps the code it was given the first time.
Which leaves the metadata editor a smaller but genuinely useful role: pre-delivery organization. It reads tags on every format its parser supports and writes MP3, FLAC and OGG-Vorbis, and it never re-encodes your audio, so the audio region stays bit-identical on every save. Use it to confirm the file you're about to hand over is the master you think it is, and not the rough mix from Tuesday with the same filename. That mix-up is far more common than any tagging error, and it's unrecoverable once the release is live. How to edit audio metadata covers the tagging side properly.
Your pre-flight checklist
Run this on the exact file you're about to upload, not on an earlier bounce.
- Right file? Open it, play the last 10 seconds, confirm the fade and the ending. Fail if it's a different bounce than you think.
- Integrated LUFS measured, not guessed. Anywhere from about −16 to −9 is a legitimate release, but the two ends carry different obligations: the closer you get to −9, the more of your loudness gets normalized away and the harder the true-peak rule below bites. Fail if you haven't measured it.
- True peak ≤ −1 dBTP, and ≤ −2 dB if your integrated loudness is louder than −14 LUFS. Fail on anything above 0 dBTP, always.
- Sample rate 44.1 kHz or higher, stereo. Fail below 44.1 kHz.
- Bit depth = your native master's depth. Fail if you upsampled to hit a number.
- No lossy round-trip. The delivered file came straight from your master, not through an MP3 or a 16-bit converter step. Fail if you can't trace its history.
- Distributor spec matched — check the format list above against the one you're actually using.
- ISRC assigned by your distributor, and release metadata entered in their form rather than only in the file's tags.
Everything above the ISRC line runs in the browser on your own device. Your audio never leaves it; the processing engines download to you on first use, and your file goes nowhere. If this is your first release, the beginner's workflow from raw recording to finished edit covers the stages leading up to this one, and the how-to guides collect the rest.
Frequently asked questions
What LUFS should I master to for streaming? Land somewhere between roughly −16 and −9 LUFS integrated and pick the level that suits the music, rather than targeting one exact number. Spotify normalizes playback to −14 LUFS, but that is a playback reference, not a mastering target — the platform sets the level on playback either way. Master for tone and dynamics first, then measure what you got.
What true peak should I leave before uploading? Below −1 dBTP as a baseline, and below −2 dB if your master is louder than −14 LUFS integrated — that conditional part is Spotify's own published guidance and is widely omitted. The margin exists because a lossy playback codec like AAC reconstructs the waveform on decode and can produce peaks higher than the file you delivered.
Should I upload 24-bit or 16-bit audio? Deliver your master's native bit depth. Spotify asks for 24-bit only if that is what your master actually is, and 16-bit when nothing deeper exists; upsampling adds no information. Files below 16-bit/44.1 kHz get upconverted but are not eligible for lossless playback. Apple Digital Masters is the exception that specifically requires 24-bit.
Do I need to embed metadata and my ISRC in the file? No. Your distributor's release form supplies the artist, title, artwork and ISRC that stores and streaming services display; DistroKid states that previously embedded information is disregarded by streaming services. Embedding tags does no harm and is useful for your own file organization, but do not rely on it to carry anything to the platforms.
Can I upload a song to Spotify directly? No. Spotify's artist upload beta closed at the end of July 2019, so every release reaches the platform through a distributor such as DistroKid, TuneCore or Amuse. That means the file spec you must satisfy is your distributor's, which varies — TuneCore's upload page names only WAV, while DistroKid accepts WAV, MP3, M4A, FLAC, AIFF and WMA.